Writer's Workshop: Get Ready
Where to Begin-Finding your topic
Looking back at my first attempt–those journals–I knew right where to start. I needed to teach my children how to pick a topic. This is always the hardest part. Once you know what to write about, it gets a bit easier.
Using the first notebook, label the first page: LISTS. On this page you will teach your child to create a list on any topic, such as their likes or dislikes. This is your first mini-lesson. Teaching them this is the first stage of picking a topic. After the list–have them choose one item from it. This is now their topic.
There are other ways to help them to choose a topic. Listing is just one. Below is a few of the ways that you can help your child bust through that writer’s block. (Be sure to give each method it’s own page in the front section of the first notebook, and label the page with the correct label.)
JOURNALING: Looking at previous writing entries and elaborating on it. This is a good follow up to the first option of LISTS. Once you have a few entries in your journal/writer’s notebook then you can take those entries and see what you are writing about. Did you write about something that can be elaborated on? For your notebook you would write journaling at the top and then make a note on the page about which journal entry, what date, what you wanted to elaborate on. So if your son was writing about playing soccer with his best friend and he mention his friend broke his finger, but doesn’t explain how–he would make an entry on this page. For example:
Journal entry on July 10th. I mentioned Jake’s broken finger–I should tell what happened. That was really funny even though Jake got hurt we can’t stop laughing.
At this point, you can then move on or go back and have them rewrite the journal piece into a more finished product.
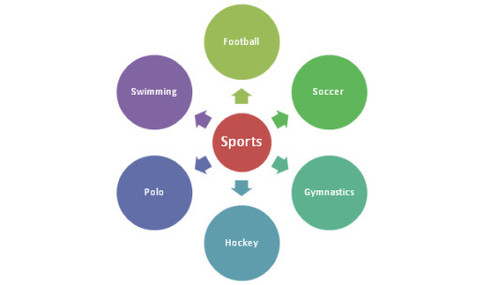
CLUSTERING: Taking a broad category and branching off the center “bubble” to create more defined topics. Such as Sports–break it down to football, soccer, tennis, etc. Below is a picture that has a chart that illustrates this.
WRITING PROMPTS: This is basically a jump start to get your child
writing. It gives your child a place to start. The prompt could be
something like: “One day I . . .” OR “I wonder how . . .” etc. There are
many places on line that offer suggestions for writing prompts. Many of
these websites are free, however be sure to double check that there are
no fees before signing up for any services.
CREATE A CHECKLIST: Checklists can be of various things. Such as how to’s, life essentials, etc.
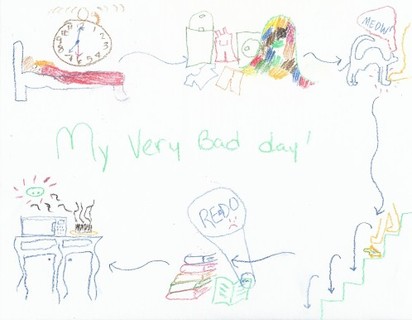
LIFE MAP: This utilizes the creative mind. The child will make a detailed drawing of their day or week, perhaps even a year. They will then look it over and circle the items they feel can–or should–be elaborated on. Things they have an interest in or feel would tell a humorous tale.
OBSERVE YOUR SURROUNDINGS: Life happens all around and that is what
writing is all about–writing about life. History or personal experiences
can lead to a treasure trove of experiences that your child can write
about. Have your child look around them–what do they see. Have them
write it down.
NOW WHERE TO GO?
Once they have chosen your topic, you will need to have them write on it. For this you will turn to the LAST page of your first notebook, and have them do one of the following (Again be sure to label the page) activities. These are NOT your actual rough drafts; this is just a way to begin to show them ways of writing. These are examples. However, feel free to take each example and work it to a finished piece ready for publication!
FREE WRITE: This is just taking a specified amount of time and letting them ramble about the topic. Set a timer. There is no picking up the pencil. If they can’t think of what to write tell them to write over and over “I really don’t know what to write about ________ (insert topic).” Eventually, well hopefully, they will get a glimmer of an idea. If they don’t you, and they, will know that free writing isn’t the best practice for them.
SCRAP WRITING: This is having them focus on just one aspect of the topic–such as how it looks, sounds, tastes, what it does, what they think when they hear the word, etc. It takes the narrow topic, and defines it even more. This can be repeated for even more aspects. It’s very effective for teaching how to describe characters or locations and for adding details to their writing.
5 W’s & H: This is the classic. WHO? WHAT? WHERE? WHEN? WHY? HOW? These can just be answered simply and then elaborated on during the actual writing.
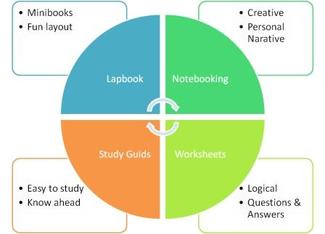
CLUSTERING: Again this can be used to help brainstorm ideas. Help define details and more. Refer to the chart above. If they take that previous cluster map and chose their main topic, they can then use a new map to break down their thoughts even further. Below is a chart that breaks down learning aids into their sub-parts.
So now you have a starting place. Work on various ways to define your
topic and elaborate on it. Practice it so that they will be ready for
the next portion of this lesson plan. Use the first notebook for this
writing. Be sure to label each page accurately for future reference.
Making a small table of contents on the inside of the front cover will
help you keep track of where each example is located.
Here is a download that provides readymade table of contents: Table of contents form (http://www.mediafire.com/?wme55dmzqom)
Keep in mind that you will need 2 TOC’s. One is for the front cover and
one for the back. Then you can keep track of both sections. There are 3
in the download in different colors to give you a choice.
The reason you put the second section at the back is to give yourself a little organization. Another option would be to add tabs to your notebook–Tabs can be Mini-lessons and Examples. However you need to make sure that you leave enough room for more mini-lessons (This will be covered in a future article). The second notebook will come in handy in another article as well. For that you will need 4 tabs.
Well this will get your Ready, pretty soon we’ll cover what you need to Get Set, and then you’ll be off and ready to WRITE!


